31 October 2012
Bloggers quilt festival
Click the image for more information about the Bloggers quilt festival, if you don't know anything about it, it's actually really cool and a way for quilters around the world to get together, when so many of us live busy lives.
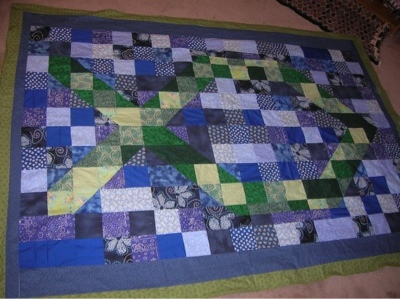
This is the quilt I made my husband. Up until this point I had only made quilts with squares. I had made some quilts with designs, but they were all squares. I knew I wanted to make the inch this design for my husband. He's volunteered at a music festival called ichthus and his faith is very important to him.
I was talking to a friend that quilted (much more than I!) and I showed her my square designs and she suggested I make half square triangles. Those were very new to me. But I learned how to make them and I think the quilt turned out quilt nice!
Our first apartment we lived in we used this as our "comforter"/bed quilt because it was large enough for both of us.
I wanted to give it to my then fiancé on our wedding day. But I forgot my foot pedal for my sewing machine and so I had no way to sew. I gave it to him about three weeks later :)
Ichthus quilt
Finished quilt measures : 82"x65"
Special techniques used : HST
Quilted by : Me
Best Category : favorite 2 color quilt, favorite bed quilt
Labels:
finished project,
HST
29 October 2012
Fun mail!
I received my block from Debra!!
I love it! Plus a small block that I'm going to add a border to so that I have another!
Isn't that kitty just adorable?!?!
I love it! Plus a small block that I'm going to add a border to so that I have another!
Isn't that kitty just adorable?!?!
Labels:
block received,
block swap adventure
28 October 2012
Testing Quilting designs
So when I learned how to use the long arm quilting machine a few weeks ago, she suggested I use a whiteboard to practice drawing designs, because of how the marker is held. It would be similar to quilting on the machine.
Because of being a teacher I will actually put my hand on the board to steady my hand as I write, so I wasn't sure that idea would work for me.
So I have just been pinning things on pinterest that I thought it would be fun to try on the Long arm machine next time I go. As I was thinking about it though, I thought that I could actually use my ipad to practice drawing quilting designs!
The app I used is called Bamboo paper, Itunes link to bamboo paper. It is free, but they also have a paid version, which I use, because you can have multiple "books" so I have a "quilting" book.
So here are some of the ones I tried out. Some of them are a little shaky because we were in the car while I drew these.
Doing "ferns"
Writing words
This was just practicing. The cool thing about Bamboo paper is that you can insert pictures. so I just played around and put in a block I have made and made a quilting design in it.
And I also did it with my scrappy Jacobs ladder. Just to see what the meander would like like on it.
Because of being a teacher I will actually put my hand on the board to steady my hand as I write, so I wasn't sure that idea would work for me.
So I have just been pinning things on pinterest that I thought it would be fun to try on the Long arm machine next time I go. As I was thinking about it though, I thought that I could actually use my ipad to practice drawing quilting designs!
The app I used is called Bamboo paper, Itunes link to bamboo paper. It is free, but they also have a paid version, which I use, because you can have multiple "books" so I have a "quilting" book.
So here are some of the ones I tried out. Some of them are a little shaky because we were in the car while I drew these.
Doing "ferns"
Writing words
This was just practicing. The cool thing about Bamboo paper is that you can insert pictures. so I just played around and put in a block I have made and made a quilting design in it.
And I also did it with my scrappy Jacobs ladder. Just to see what the meander would like like on it.
Labels:
ipad,
ipad app,
long arm quilting machine
26 October 2012
Block swap across the pond!
For the month of October my partner was http://rubyru-rubyru.blogspot.com She asked for a block in Red and aquas, that was a star pattern.
This is what I was able to come up with!


I chose to do two blocks because I wasn't sure which one I liked better. Hopefully Helen likes them!
This is what I was able to come up with!
I chose to do two blocks because I wasn't sure which one I liked better. Hopefully Helen likes them!
Labels:
block sent,
block swap adventure
25 October 2012
UFOs
So I went through all my fabrics/projects to figure out what I have that needs to be finished and to to find a way to finish it. I added the year that I started the quilt. I am hoping to get a lot of these finished soon! Probably next year after I get my Christmas presents done.
Spools - add brown to sides/top, quilt (2010)
Two panel, decide what to do (2010)
UNI quilt, finish putting blocks together, quilt (2010)
Floral blocks - decide what to do. Was going to try a quillow (2009)
One panel - table runner - not sure how to finish it. (2009)
Pinwheel quilt along - finish blocks, put it together. (2010)
Maverick stars - add row of triangles, quilt (2011)
Indiana quilt exchange - quilt (2011)
Pique nique quilt - add a back, quilt (2010)
HS tee shirt quilt interfacing. (2012)
Binding on prequilted material (2005)
X-blocks - quilt (2010)
Chinese coins (2011)
Christmas/thanksgiving runner (2009)
Sudoku quilt, no clue what to do. To quilt it possibly use a different design in each block. (2011)
Spools - add brown to sides/top, quilt (2010)
Two panel, decide what to do (2010)
UNI quilt, finish putting blocks together, quilt (2010)
Floral blocks - decide what to do. Was going to try a quillow (2009)
One panel - table runner - not sure how to finish it. (2009)
Pinwheel quilt along - finish blocks, put it together. (2010)
Maverick stars - add row of triangles, quilt (2011)
Indiana quilt exchange - quilt (2011)
Pique nique quilt - add a back, quilt (2010)
HS tee shirt quilt interfacing. (2012)
Binding on prequilted material (2005)
X-blocks - quilt (2010)
Chinese coins (2011)
Christmas/thanksgiving runner (2009)
Sudoku quilt, no clue what to do. To quilt it possibly use a different design in each block. (2011)
May block that I sent
I sent this block to Debra to May. I thought I had taken a picture of it, but I couldn't find it. So I asked Debra if she could send me a picture! (may 2012 swap)
This block was paper pieced, and I must say this is one of the best paper piecings I have done!! I normally have an issue getting the points & lines to match up!
And if you are interesting in joining the group here is a banner to the blog!
This block was paper pieced, and I must say this is one of the best paper piecings I have done!! I normally have an issue getting the points & lines to match up!
And if you are interesting in joining the group here is a banner to the blog!
Labels:
block sent,
block swap adventure
24 October 2012
Quilt Contest (again)
I was browsing quiltinggallery.com earlier and I found out there was another contest. This weeks theme is "Dots, Checks, Stripes" so I decided I would enter and I found the PERFECT quilt!!
I have actually shared more about it here. For today I am just going to share the picture I submitted for the contest. The contest does not open for voting until Friday. you also do not have to register to vote.
Do you want more information? Do you want to enter your quilt?! Click the image below
I have actually shared more about it here. For today I am just going to share the picture I submitted for the contest. The contest does not open for voting until Friday. you also do not have to register to vote.
Do you want more information? Do you want to enter your quilt?! Click the image below
15 October 2012
More finishes!
I'm shocked! Now I probably should have been grading papers, but my sewing machine was calling my name!
I finished two more UFOs tonight (unfinished objects).
The first is my first jean/flannel rag quilt. Granted it has not been washed and "ragged" yet. I have definitely learned a lot about it. Next time the squares will be bigger and I will take a 1/2" seam allowance.
The second was a fleece "rag" quilt I bought at Jo-Ann's in 2005! I needed to get that bad boy done! And hopefully out of my house soon!
I finished two more UFOs tonight (unfinished objects).
The first is my first jean/flannel rag quilt. Granted it has not been washed and "ragged" yet. I have definitely learned a lot about it. Next time the squares will be bigger and I will take a 1/2" seam allowance.
The second was a fleece "rag" quilt I bought at Jo-Ann's in 2005! I needed to get that bad boy done! And hopefully out of my house soon!
Labels:
UFO
14 October 2012
Busy bee!
I have been so busy this weekend. And I sure got a lot done!
I made 6 aprons. I made stocking ornaments. And I finished my values quilt.
Most of this stuff I'm going to try to sell at a craft show this weekend in Indy.
I'm excited. I'll be doing it with my mother in law. We did one about this time last year.
I made 6 aprons. I made stocking ornaments. And I finished my values quilt.
Most of this stuff I'm going to try to sell at a craft show this weekend in Indy.
I'm excited. I'll be doing it with my mother in law. We did one about this time last year.
13 October 2012
Long arm quilting
I have wanted to try a long arm quilting machine forever, I would love to own one, but they are so expensive (even buying used!) so we haven't been able to afford it, but a local quilt shop has one in the shop that people can use. I was SO excited! I finally heard back and today I was able to take the lesson to get trained on using it.
It's not that complicated, but I sure am glad I was able to take a class, I am going back in two weeks to actually quilt a real quilt!! (now to just finish the top ;) ) I did get to bring home a souvenir.
Here is my top
Here is the stitching from when I first started. You can see my loops and stars
My name ;)
On the left are my teachers hearts, to the right mine. and she showed me how she would fill in at the bottom.
and on the left here are her leaves and on the right mine
It's not that complicated, but I sure am glad I was able to take a class, I am going back in two weeks to actually quilt a real quilt!! (now to just finish the top ;) ) I did get to bring home a souvenir.
Here is my top
Here is the stitching from when I first started. You can see my loops and stars
My name ;)
On the left are my teachers hearts, to the right mine. and she showed me how she would fill in at the bottom.
and on the left here are her leaves and on the right mine
Labels:
long arm quilting machine
09 October 2012
Finished top!
I was hoping to post this as a finish. But it might be a few days. I actually started this probably two years ago, around the time I started this blog. I found someone who was talking about values quilts. I decided to take a LARGE stack of 4" squares I've had (forever!) and make HSTs. I'd started putting them together and Saturday I got the top done!
The first picture is me holding the top. It's 54"x46".
I decided to back it with red fleece. I quilted in the ditch around the diamonds.
While I was making this project I actually didn't care for it much. But once I got the top done, stepped back and looked at it! Wowsers! I loved it!! You could really see the dark versus the light! (I'm hoping I can see that with my Jacobs ladder quilt!).
The first picture is me holding the top. It's 54"x46".
I decided to back it with red fleece. I quilted in the ditch around the diamonds.
While I was making this project I actually didn't care for it much. But once I got the top done, stepped back and looked at it! Wowsers! I loved it!! You could really see the dark versus the light! (I'm hoping I can see that with my Jacobs ladder quilt!).
02 October 2012
Mini design board!
We haven't found a permanent place to live yet, so I don't want to put up a full design wall. But I found this GREAT tutorial to make mini design boards!
Mini design Board! from bee in my bonnet!
I love it, because Minnie likes to sit in my space next to my sewing machine, and my ironing board is on the other, so I have to roll all around trying to get a block put together! This way I can leave it in my lap or even on my ironing board.
In the tutorial she made them 10x10 so she was able to get 6 from one board. Well most blocks I make are around 12" so I wanted it a little bigger. I made one board 15.5" (that foam board is hard to cut!) and one 14", so I only got two!
It took FOREVER because the tube of fabric I did for the border took forever to turn right side out. I thought about it, next time I am just using ribbon!!
Here is my board!
Here is my board with a block on it! I can't wait!
Mini design Board! from bee in my bonnet!
I love it, because Minnie likes to sit in my space next to my sewing machine, and my ironing board is on the other, so I have to roll all around trying to get a block put together! This way I can leave it in my lap or even on my ironing board.
In the tutorial she made them 10x10 so she was able to get 6 from one board. Well most blocks I make are around 12" so I wanted it a little bigger. I made one board 15.5" (that foam board is hard to cut!) and one 14", so I only got two!
It took FOREVER because the tube of fabric I did for the border took forever to turn right side out. I thought about it, next time I am just using ribbon!!
Here is my board!
Here is my board with a block on it! I can't wait!
06 September 2012
05 September 2012
My "helpers"
I shared a picture of the kitties helping me on baby C quilt #3 but I couldn't post a better picture because I didn't want to give away what the quilt looked like! But now that Kelley has received it, I can share more!
Pepé felt this was the best place for a bath. . .
So they were both laying on my sewing table, and didn't move when I asked them to. So I just put the quilt on top of them. And they both chilled there for a few minutes!
Minnie checking for stray pins and safety pins
Pepé felt this was the best place for a bath. . .
So they were both laying on my sewing table, and didn't move when I asked them to. So I just put the quilt on top of them. And they both chilled there for a few minutes!
Minnie checking for stray pins and safety pins
Labels:
cats
28 August 2012
Baby C quilts #3
So I am a terrible friend!! When Kelley had her first two babies, I had those quilts to her LONG before the babies were there. Well baby C #3 is almost nine months old, and he doesn't have his quilt yet!!
Part of it, was that I didn't know which pattern to use, and when I did decide on a pattern I couldn't decide on the fabrics. I chose to do the pattern irish chain. I decided to go scrappy.
Here's the front and part of the back. You can kind of see here, I chose to do a scrappy binding also.
I stitched in the blue squares, so big diagonals. I wasn't sure what to do in the white spaces :/ I wish I had an embroidery machine so I could have put his name or first letter of his name in it.
Part of it, was that I didn't know which pattern to use, and when I did decide on a pattern I couldn't decide on the fabrics. I chose to do the pattern irish chain. I decided to go scrappy.
Here's the front and part of the back. You can kind of see here, I chose to do a scrappy binding also.
I stitched in the blue squares, so big diagonals. I wasn't sure what to do in the white spaces :/ I wish I had an embroidery machine so I could have put his name or first letter of his name in it.
Labels:
finished project,
kelley
23 August 2012
Jacobs ladder keeps growing
I should have been in bed at least an hour ago. But I was working on my Jacobs ladder blocks!
This week was my first week back to school, and I've been stuffy all week. Well tonight was the first night I felt better, I don't have any school work and I haven't been in my sewing room for two weeks, I decided my machine and I would spend some quality time together!
This is what I got done (well some of it). I now have a total of 14 blocks. I have not decided how many I'm doing. I'd thought 20, 5x4, but I'm afraid it'll be too small, so I might do 6x5. Since it is so scrappy I'm not sure a border would work. We shall see!
As I lay it out, I feel like the lights and darks are so similar, but when I look at this picture I can definitely see the lights versus the darks!
This week was my first week back to school, and I've been stuffy all week. Well tonight was the first night I felt better, I don't have any school work and I haven't been in my sewing room for two weeks, I decided my machine and I would spend some quality time together!
This is what I got done (well some of it). I now have a total of 14 blocks. I have not decided how many I'm doing. I'd thought 20, 5x4, but I'm afraid it'll be too small, so I might do 6x5. Since it is so scrappy I'm not sure a border would work. We shall see!
As I lay it out, I feel like the lights and darks are so similar, but when I look at this picture I can definitely see the lights versus the darks!
The border workbook
I really don't need quilting books, with the internet being as vast as it is, but I can't seem to help myself!! I had to buy one online!!!
I found a border I just loved (that I plan on using with in the next few months) but I coudl'nt find a pattern. Well I came to find out that it was in the book "the border workbook" after debating with myself about it, I had a little money in my paypal account, so I decided to buy it!!
I am glad I did, there are SO many cool borders in there! it makes me want to finish quilts just to add a border to them ;)
I found a border I just loved (that I plan on using with in the next few months) but I coudl'nt find a pattern. Well I came to find out that it was in the book "the border workbook" after debating with myself about it, I had a little money in my paypal account, so I decided to buy it!!
I am glad I did, there are SO many cool borders in there! it makes me want to finish quilts just to add a border to them ;)
21 August 2012
Baby C quilts #2
When Kelley got pregnant with her second baby she found out it was going to be a girl. I was SO excited!! Girly quilts are so easy (pinks and purples!! I love purple!) and fun!
I also tried to a new thing for this quilt. I used an equilateral triangle, which I had seen on fons & porter. But I didn't remember exactly how to use it, so I have a lot of triangles in my scrap bins!
Here is the finished quilt.
Here is a close up of the quilting I did. Inside the triangles.
And the back and binding. The back is minky, and the binding I used pinks and purples.
I also tried to a new thing for this quilt. I used an equilateral triangle, which I had seen on fons & porter. But I didn't remember exactly how to use it, so I have a lot of triangles in my scrap bins!
Here is the finished quilt.
Here is a close up of the quilting I did. Inside the triangles.
And the back and binding. The back is minky, and the binding I used pinks and purples.
Labels:
finished project,
kelley
16 August 2012
Scrappy Quilt contest
My favorite scrappy project I have made thus far! A log cabin, with all the fabrics I have used in others quilts. Every time I use it I can think about quilts that I have made for all the people I love :) Of course for the contest I could only post one picture, but here I have a few others ;)
This is one layout I tried out (there are a lot of ways to lay it out!!)
Here is Pepé helping me decide on a layout
Here is the finished quit with the back. It has some purple minky on it.
And the top on it's own.
Labels:
cats,
contest,
finished project,
links,
scraps
Subscribe to:
Posts (Atom)


