Showing posts with label shadow tee shirt quilt. Show all posts

06 May 2020

Tee Shirt Quilt done!

I decided in the long run to add the smaller blocks to the top of the quilt.

I added a 2" sashing because I didn't want the quilt to get TOO large.  I measured each row, and for the most part each of them were close in size! I did end up having to add a little sashing to the top of some of the rows.  Then I added a full row to the top & bottom of the little blocks.


I also added a slightly larger border to the bottom, I figured that if I felt it was too long after quilting I could trim it, same for the side borders.


When I quilted it I actually did it upside down, because the of the back.  (there is a picture further down), but I had one small block left over and I used it in the back, I wanted to make sure the whole thing was on there. (If you don't know, when long arming you need to make sure your backing is a few inches larger in width & length to be able to attach it to the machine.)


Here is the finished quilted quilt!


And this is the back.  I don't think I have a close up of the fabrics I used, the left & right pieces have donald duck on them.  My FIL loves him.  I had actually bought the fabric for the back a few years ago to make him a quilt.  I think it works well for the back!  You can see the one extra block on the bottom right.  The bottom left is the label I used.  I tried something new.


It's cricut infusible Ink.  I usually have done corner labels and write them with a pen, but after a few washes, it ends up coming off :/ infusible ink will NOT do that!  Next time I will use my heat press to do this, you can see where I kind of moved the transfer sheet with the iron.

 I should have made it a small block on the backside, but I folded over the edges and stitched it right on top.  But like I said it's my first time, gotta start somewhere!

If you are interested in a tee shirt quilt I have more information here

You can connect with me on facebook or send me an email.

04 May 2020

Tee Shirt Quilt 3


Here is the next row.  I added slightly wider sashing between the blocks so they they would be approximately the same height as the first two rows.


I got real excited because there were some thinner blocks here, and you could really see them "floating" with the shadow!


And here are all 4 rows done.  

I also had some smaller blocks that I originally was going to intersperse throughout the quilt, but decided it would add too much length.

So then I had thought about adding them as a row by themselves, but then I was afraid it would make them the quilt too wide and not long enough.  I think what I might do is add them to the top or bottom.

01 May 2020

Tee Shirt Quilt 2


Since my blocks weren't all the same size it took some work to add them to each other.  I started with the row that I thought would have the largest blocks and be the longest. 


I made the blocks that were the smallest and added sashing to the sides so that they were all the same width.  Then I added a small sashing 1.5" to each block.


Then I did the same thing to the next longest block, changing the size of the sashing to try to make sure that it was the same length as the first row, again, having the design wall was SO helpful.


29 April 2020

Tee shit Quilt 1

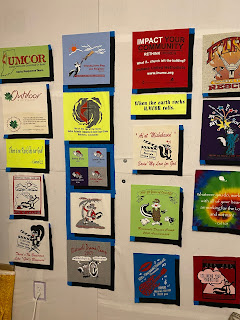
  So I have started another tee-shirt quilt.  This one is for my father in law.  He used to help out at a Drama Camp each summer, so most of these shirts are from that.


I decided I would try a new to me technique, and make a shadow on each block.  I have seen it done, but not tried it yet.  I chose to use strips that were 1.5".  The only "struggle" I really had is that most of the blocks were different sizes, so I had to do a lot of measuring to make sure the black was the right size. 
Next time all the blocks will be the same width & length. 


I LOVE my design wall.  And it helped me so much when making this quilt.  I was able to put the blocks up as I worked on them, but also be able to rearrange them so they were in a design pattern that I liked.