02 February 2022

Traveling with a Singer featherweight

When I found out my husband's grandma had a singer featherweight, I asked to borrow it as we were traveling for thanksgiving and flying.  I was told yes.  But I knew I didn't want to travel with it in it's black case. 

Well the featherweight fits perfectly into my Vera Bradley Miller bag!!

So I open the bag up all the way, and I put a quilt inside it.  Usually the first time I put the quilt around the machine and then slide it into the bag.


Here you can see how snug the machine fits into the bag.  The best part is, there are pockets, which leaves me room for putting things like bobbins, thread, scissors, pins, etc.


And then it zips up all nice.  And it has nice long (padded) straps so I can easily put it on my shoulder or on top of a suitcase to travel with it.


A few tips for traveling with it (through an airport).  Take it out of the bag when going through security and put the machine in a bin by itself.  Now there have been sometimes they don't care when it's in the bag, but there are sometimes they do.  So it's just easier to put it in the bin beforehand.

Expect to have people ask you about it! I always have good conversations with TSA employees about the machine, they usually reminiscing about a machine someone in their family had.

I have not actually used this to sew at a gate (usually electric plugs are hard to come by) but it would be a possibility.  But once I get to my destination she usually comes out of the bag and is set up.

I don't just use this for air travel, it's handy when I am doing my craft fairs, or sewing nights, because it's easy to take a long.  

If you have any questions about traveling with a (singer featherweight) sewing machine please let me know and I will do my best to tell you my experiences!

31 January 2022

Masks

School has started requiring masks again.  And since we moved I don't know where my masks went!  So I needed to make some new ones.  


I might not have known where my masks were, I knew where my cricut supplies were! so I was able to cut out some new masks.  I have very little waste on these, the little squares are part of my leader/enders (yes I am working on more than one!) and then 2.5" squares to keep up my collection (not that it's getting any smaller after all the quilts I feel like I have made with them!

Here are some of the masks I have recently made for myself.

19 January 2022

Sewing Room finished

It took a lot of work, but we finished the sewing room floors!!


I love how they look, I loved being able to say that we did it! I also love the color with my purple walls. 

And I created this image with a before & after.


I love the purple so much! I cannot wait to show you how it looks with everything in here!
 

17 January 2022

Battery Power

I love my featherweight.  I love bringing my featherweight along to my craft fairs, it's a conversation starter, and I get lots of things done also!


Not every craft fair I attend allows electricity or has it available.  Which stinks for multiple reasons.  But my awesome husband found a cool "gadget".  

We use a Ryobi electric lawn mower at our house.  They have these things that you can plug them into and then use outlets like normal (and USB outlets also).  So I have been able to sew at every craft fair I have gone to recently!

While it was a little expensive at first (we already have batteries) looking at the cost of paying for electric for every craft fair I go to, it should pay for  itself off soon!

And bonus it could be used for other things also! 


14 January 2022

Carrot Cake

Someone on instagram was looking for pattern testers.  I looked at her timeline and our timeline with moving and thought I would be able to do it!  So I signed up to test Carrot Cake quilt pattern.  she actually released 3 patterns, with different colour ways. 

I really enjoyed the pattern.  It went together pretty easy.  It would have gone together easier if I wouldn't have been in the middle of a move, living in a hotel then a make shift sewing room!


You can kind of see the sizes of the pieces here.  I liked how big they were, it helped it come together quickly.  Although I was supposed to make a queen size quilt, but I did not, because I lost some pieces.  I did end up finding them after I moved into my sewing room.


Here is the quilt 100% finished, quilted, bound and washed.


And here is the recipient of the quilt! It's for my grandson, Kaison.  He didn't get it when he was born, but about a week later when we were able to meet him.


He was making this face when I laid the quilt out on him in the car.  So I turned it into a meme.  So excited that grandma made me a quilt! His mom has been teaching him right, because she already loves quilts! He always wants hers!

 I decided to make this quilt a little bit bigger than a baby size quilt, because I wanted him to be able to have it for a while.  Not that I won't make him another one, but I wanted one that he could use even in a few years!

12 January 2022

New sewing room

Since we recently moved, I got to pick a new sewing space!  And since we plan on being here a while, I wanted to put everything I have ever wanted in here.


Here is Earl in the closet.  I am excited to have a walk in closet, it's a lot easier to put things in, so much space!


I chose purple for the walls.  It's actually the same purple as my previous sewing space! I really liked that color!


I wanted to have hard floors, so we took up the carpet.  (After we painted ;) so we didn't have to worry about paint getting on the floors!)


Here is the room all cleaned out, with the box of floor boards on the floor.


And the first few pieces in the closet!
 

10 December 2021

Quarantine Quilt 2

In 2020 during Quarantine when I was working from home I wanted things that were easy to sew, that didn't require me to think.  I shared pictures of the start of it (here)


When Christine came out in June she wanted to long arm, but I wanted her to try something out before quilting her quilt on it.  So I thought this quarantine quilt would be a good way for her to practice using the long arm before doing her own quilt.

Once I finished the quilt I decided to bind it and gift it to Christine.  She was about to go on a new adventure in her life and I thought having a quilt might be something nice for her to have.

She also had never received a quilt as a gift.  


Because of the timing of it all I did not get any pictures of the quilt before she left.  But I did get one when we visited her for thanksgiving!


I love how much of a design can be made from just light and dark fabrics.  The HST were light and dark, the 16 patches with 2.5" squares I didn't sew them together in any specific fashion.

09 July 2021

Flying geese

I am going to go through a quick tutorial on how I make flying geese (without my accuquilt).  I definitely prefer the accuquilt if I have a choice.  


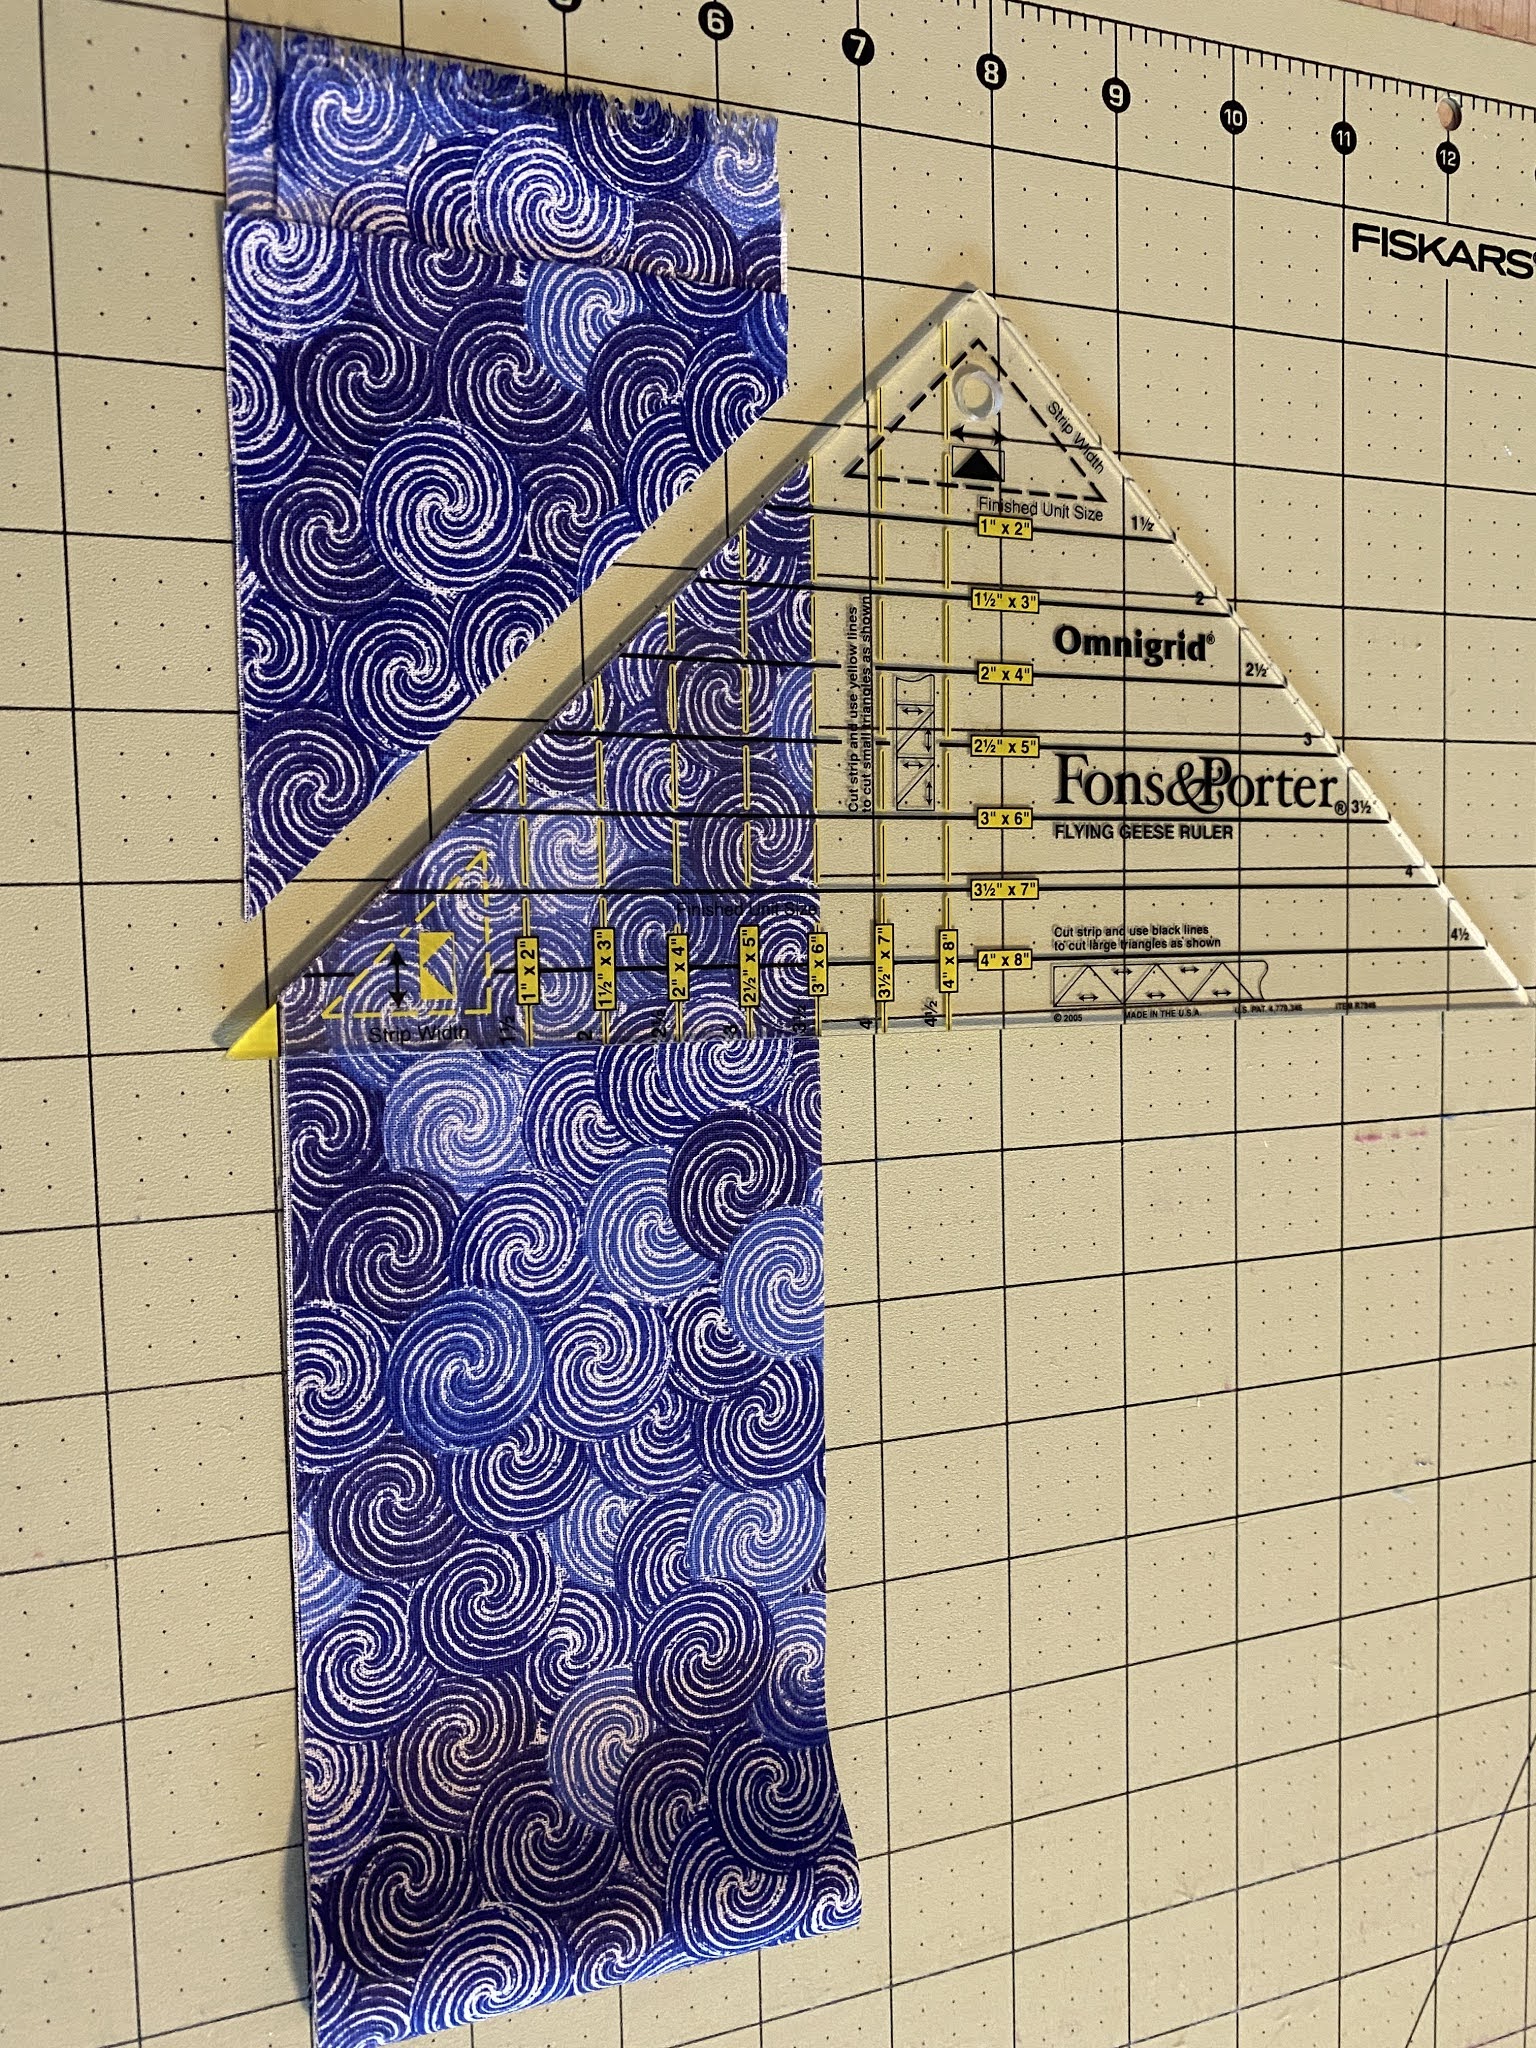
I used a shape cut ruler to cut strips.  The ruler I used tells you what size to cut the strip.  


Once the strips are cut, you line up the ruler to cut it.  The nice thing is how it lines up, it cuts off the top of the triangle. 


Then you turn the ruler to cut the outside pieces.  


This is the one reason I prefer the accuquilt cut pieces.  They cut off both dog ears.  but I managed to make it through without having any of the triangles get eaten.

and ta-da! a finished flying geese block!  I can't wait to share the whole quilt!


What's your favorite method for making flying geese?


25 June 2021

Rainbow cats finished quilt

I had actually decided what I was going to do for this graduation quilt last year, before I had EQ, but I used EQ8 to help me figure out how many blocks to do and the borders.  I knew I was going to use muli colored cats, but I kept them blue for the ease of design.

 
The beauty of EQ8 is that I used it to tell me how much fabric I needed for the borders (I, of course bought a little extra just to make sure), but it was nice that I didn't have to do the math of figuring out how much I needed.  The program did it for me!

Generally I try use as much stuff at home as I can, but we are in the process of moving, so most of my fabric is packed! So I did have to buy some to finish the borders.  But I am glad I did, because I found some CUTE cat fabric.


Here is the finished top! I don't know if you can tell, but the outside border is rainbow cat prints!

I just did a simple meander in grey.  With a wide flannel grey back (which I did not get a picture of).  Wide back fabrics are definitely favorite for quilt backs, although soon I will have to sew them together to use as a backing for a scrappy quilts!


And here is the finished quilt! I am so happy with how it turned out!  And the recipient liked it too, which is all that matters!


23 June 2021

Rainbow cats 6


Here is a little time lapse of me putting together one of the kitties.  You can see I have some help from Minnie :) I love doing time lapses like this.  Makes me feel a lot faster than I am ;)


 The grey kitty was the last one I had to make.  Ideally I would have liked to make 3 more, to make it just a little wider.  BUT I just didn't have the time. I was on a time crunch to get this quilt done for a high school graduation.

But I actually think it works the way it is, because the young man this is for, I made a quilt similarly with HSTs & 2.5" squares for his sister (here), and hers had 12 blocks, 3x4.  So while it's not quite as wide as I would have liked, it kid of keeps a theme for the family of graduation quilts.  I will use borders to help make it a little wider.

I am happy with the colors I picked.  And while I would have rather just had one of each color, I don't know what other colors I would have done if I only had one green!

One of the things I thought about after putting it up on the design wall, was that I should have made some of the kitties face different directions!

21 June 2021

Rainbow Cats 5


I ended up making 3 green cats, I am not sure why.  Green isn't even the fabric I have the most color of (blue is!). I decided to make the brown kitty even though I don't have a lot of brown fabrics (you can see the amount of repeats in this), but I thought it looked the most like a real kitty.


These have definitely been a scrap buster, but I still have so many scraps left!

18 June 2021

Rainbow Cats 4


 I was trying to decide which other colors to use.  While I don't have a lot of yellow, I thought it would look nice.  And even though this quilt is for a young man, I didn't think a pink kitty would be too out of place.


The pink one is definitely one where cutting down fabric can change its look.  If you look at the top left ear, it almost looks blue, because the pink fabric had blue flowers on it.  so when that one was cut and sewn back together it definitely changed the look!  It adds some character!

17 June 2021

Rainbow Cats 3


I mentioned that orange was tough because I didn't have a lot of orange.  But I have plenty of purple! I love the purple kitties.  A kitty in a kitty.  The red one was fun to do.  I included dark and light things.

Making the kitties has helped me cut up a lot of my scraps.  I am using my accuquilt to help.  Things that are too small to be put on boards I cut up into scraps with my accuquilt.  


08 June 2021

Rainbow cats 2


Here are two more kitties finished.  The orange was probably the most difficult for me.  I just don't have a lot of orange fabric.  Nothing against it.  I just don't have a lot.

I love using my accuquilt for the HSTs they go together SO quickly, and I have a large pile of them, some with black and colors and others that are neutral and colors, and even lights and darks.  I have so many ideas of quilts to make with them!

One quilt at a time though.  I need to finish the kitties.  I haven't decided how many there will be.


31 May 2021

Rainbow Cats 1


In an effort to use my 2.5" squares I decided to make these cat blocks.  I used my accuquilt to cut up the HSTs.  I was able to cut up a lot of variety in them! 

I have wrapped most of my fabric on boards, but some pieces are just too small, so I have been using my accuquilt to cut them up, most in HSTs but also tumbler blocks, kite blocks, 2.5" strips (both with 2.5" x 4.5" bricks and now 2.5" x 8.5" strips).

My scraps do not seem to be getting any smaller, I should probably spend more time sewing and that would help.  But I need to FINISH projects instead of starting them.

I can't wait to finish this quilt!


17 May 2021

Accuquilt

I definitely love my accuquilt.  I remember when they first came out, I was not interested in having one.  I am glad I waited and got the go big (the electric).

I have been trying to go through my scraps that are too small for a board and cut them up.  I cut a lot into 2.5" strips (I think you will see a log cabin soon :p)

My second favorite thing to cut the fabric up into is HSTs.  I need some for a project (I will share soon) and I wanted to have a lot of variety.


I wanted something that was kind of mindless to sew, so I sewed HSTs to black HSTs.  They come together pretty quickly.  They are also easy to sew together because the Accuquilt cuts off the dog ears so when I sew it they finish very nicely.

I am sewing some for projects, but some of them will just be saved, and then eventually I can put them together to do some sort of quilt design.  Who knows what yet.  But they are so pretty. I love the contrast of the black and the colors.  I will eventually sew some that are lights and darks so I can use them with my 2.5" squares and maybe even my 5" squares.

14 May 2021

Heritage tee shirt quilt

I was approached by someone at a company to make them a tee-shirt quilt to celebrate their 50th anniversary.  Then COVID hit, so that was put on pause.

They reached back out to me this spring.  They wanted it to be large and it would be hanging.


Because it was so large, I had no where to take pictures of it! It is 56 squares large, so 105" wide by 120" long!

Since they were going to hang it, they asked for grommets to be put on it so they could hang it.  I have done grommets before, but my husband had not, so he learned something new :)

The quilting is kind of hard to see as it was laying on the bed.  So here are two of the blocks.  I basically went around the designs to make them pop.


12 May 2021

Craft fair


This was my second craft fair of the year.  Not as large of a space, but enough room for me to sew & have my tee shirt quilt on display.

I was able to make some more cat kick sticks and cat toys.

21 April 2021

Bow ties

I think it's about time to update about the teal bowties.  Last time I posted about them was last year!

When I posted last year (here) I had 113. 

And here they are recently:
 

There are 221 (give or take).  I found one on the floor of my sewing room after I took this picture, and I know I sewed a few more up. 

I love how this quilt looks.  I especially love this one because it's got both of our fabrics in it.  Christine uses different colors than I do.  I am not exactly sure how big I will make this. At least close to the size of mine.  My quilt was 24 blocks by 28.  So 672 blocks.  So only 400 more to make :p

My quilt took 6 years to finish.  At this rate I will definitely finish Christine's sooner than that! It helps that I have two people contributing scraps.

Making masks and having my cricut has helped! Since I cut out masks with my cricut there is some waste, but I can set it so that in the negative space it cuts out pieces for the bow tie quilt (2 - 2" squares, 2 - 1.25" squares.)


19 April 2021

S family memory Quilt 2 - finished

 Jordan likes red, so we added a red border to her quilt, used red for the backing AND red for the binding.


Here is the binding being sewn on.  This is a 99 I gave to Jordan so she would have a sewing machine to use.  I would like to update it and get her a machine that has back stitch.  I shall keep looking.  But it's been a good machine for her.  And I showed her how I back stitch by turning the item around and taking a few stitches.  Not the easiest, but it's a work around.


And here is the full quilt all finished!  I love it.  And the best part is that Jordan loves it!